Some notes to Spring in Action 4th edition 3rd chapter - Scoping Beans
by libai8723
Advanced Wiring
其实在第二章中,已经讲了很多关于wiring的技巧了,但是第三章要将更多更高级的技巧。
Scoping Beans
终于讲到我关心的问题了,下面这句话英文还是非常精辟的,默认情况下被Spring Application Context创建的Bean都是单例模式的instance。我感觉不可思议。
By default, all beans created in the Spring application context are created as singletons. That is to say, no matter how many times a given bean is injected into other beans, it’s always the same instance that is injected each time.
下面这一段话就比较经典了:
Most of the time, singleton beans are ideal. The cost of instantiating and garbage collecting instances of objects that are only used for small tasks can’t be justified when an object is stateless and can be reused over and over again in an application.
大多数时候,单例模式的Bean都很理想。
原因是这样的, 当一些对象是无状态且可以一遍一遍重复使用,特别是针对一些小的任务的时候,如果不采用单例模式,那么针对这些对象的实例化和垃圾回收的成本很高,这样是不合理的(can’t be justified),所以才说在大部分时候,单例模式都是比较理想的。
But sometimes you may find yourself working with a mutable class that does maintain some state and therefore isn’t safe for reuse. 在这种情况下,还采用singleton就不好了。
因此Spring定义了若干种不同的Scope:
- Singleton:One instance of the bean is created for the entire application.
- Prototype: One instance of the bean is created every time the bean is injected into or retrieved from the Spring application context.
- Session: In a web application, one instance of the bean is created for each session.
- Request: In a web application, one instance of the bean is created for each request
居然有2种Scope都是针对web application的。
针对上面的prototype的scope,下面有一个例子,比如,我们可以使用@Scope注解来完成标记,比如下面的代码
@Component
@Scope(ConfigurableBeanFactory.SCOPE_PROTOTYPE)
public class Notepad { ... }
@Scope注解的参数,使用的是ConfigurableBeanFactory种的常量SCOPE_PROTOTYPE的常量,当然其实@Scope也支持”prototype”这种字符串作为参数,但是这样不安全,没有使用了compiler的静态检查的特性。
当然了,上面的@Scope的注解也可以针对已经标记为@Bean的Java Configuration 的Method来使用。当然也有等价的xml的配置的方案,在bean的element种,直接属性名scope,取值为ptototype,比如下面的的样例:
<bean id="notepad"
    class="com.myapp.Notepad"
    scope="prototype" />
其实从这里也能看出,xml是挺好的,但是问题是不能利用Java编译器的静态检查,并且需要对xml的语法知识有比较深入的理解。
如果这样的配置的话,an instance of the bean will be created each and every time it’s injected into or retrieved from the Spring application context. Consequently, everyone gets their own instance of Notepad.
所以的话,当被Injection发生的时候,或者从Context获取getBean的时候,其实获得是一个新的instance。这个挺有意思,要注意很多事情了,这样的话。
下面我们来看啊可能针对 Session Scope和 Request Scope
Session Scope & Request Scope
这里给出的一个经典的例子就是,在一个电商的应用中,我们可能有一个Bean来代表一个购物车,这个Bean的话,最好就是一个session scope,因为一个session代表了一个用户。如果这个Bean是Singleton的话,那么整个应用中只有一个购物车了。如果是Prototype Bean的话,那么每一次向购物车里面添加一个商品的话,其实从context获得的都是一个新的购物车Bean的instance,这样就没办法看到之前自己添加的东西了。所以说针对购物车这个Bean的话,应该就是Session Scope的,所以下面给了一个代码片段的例子:
@Component
@Scope(
    value=WebApplicationContext.SCOPE_SESSION,
    proxyMode=ScopedProxyMode.INTERFACES)
public ShoppingCart cart() { ... }
我们很容易看出来,@Scope里面的value使用的是WebApplicationContext.SCOPE_SESSION,但是另外一个叫做proxyMode的东西就不知道是干啥用途的了。首先我们说以下,value=WebApplicationContext.SCOPE_SESSION的作用,这个取值的作用是告诉Spring针对每一个session创建一个ShoppingCart的Bean。所以对于一个Spring Application来说,会有多个ShoppingCart的Bean被创建出来,但是对于一个特定的Session来说,只有唯一的一个Bean。
作者马上就解释了这个proxyMode的取值的用途了,首先作者解释了这个proxyMode的属性,所解决的问题的场景:
假设你想inject一个ShoppingCart的bean into一个singleton StoreService的Bean的话,就出现问题了。从语义上来说,这个也很好理解,因为一个电商网站只有一个仓库,但是会有多个购物车。如果如下这样写代码的话:
@Component
public class StoreService {
    @Autowired
    public void setShoppingCart(ShoppingCart shoppingCart) {
        this.shoppingCart = shoppingCart;
    }
...
}
会出现一系列的问题,首先一位内ShoppingCart被@Scope注解标记为SessionS_Scope的Bean了,所以只有当产生一个新的Session的之后,才会在context中出现一个这样的Bean;更严重的问题,其实是语义上的问题。因为会有多个用户,所以会有多个session创建,也就会有多个ShoppingCart的Bean存在,你并不是想让一个特定的ShoppingCart被注入到StoreService中,你真正想要做的事情是StoreService和当前对应session对应的那个ShoppingCart发生关系。
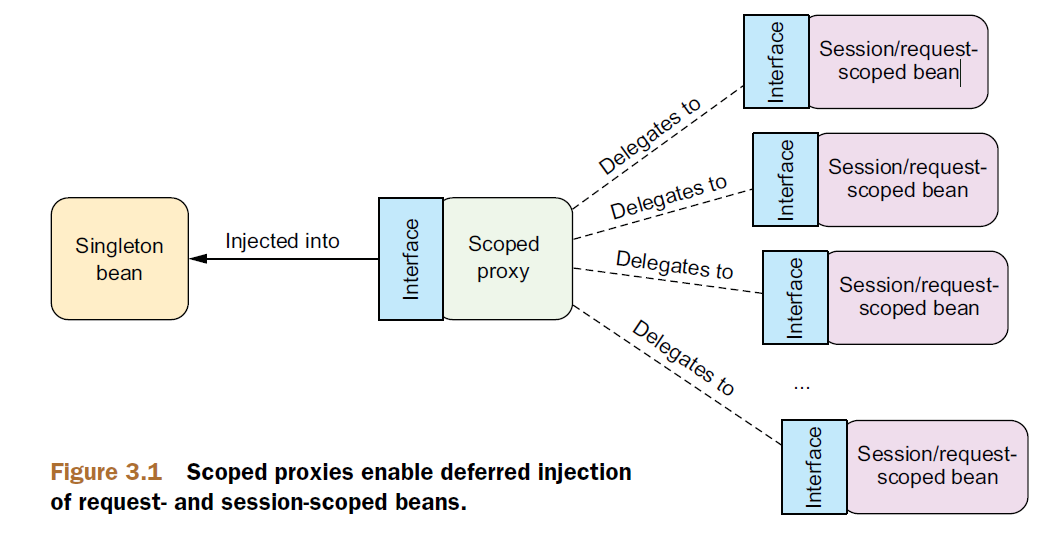
所以按照设计模式的惯例,我们应该向StoreService 注入一个ShoppingCart类型Bean的 proxy,而不是真正的选择某一个ShoppingCart的Bean注入到StoreService中。而这个proxy将会暴露出来和ShoppingCart一样的method给到StoreService进行调用,对于StoreService来说,这个proxy就是一个ShoppingCart。当StoreService调用ShoppingCart上的method的时候,这个proxy将会懒加载的 lazily 解析这个调用,并且delegate 这个调用到实际应该被调用的session-scoped shoppingCart bean.
Now let’s take this understanding of scoped proxies and discuss the proxyMode attribute. As configured, proxyMode is set to copedProxyMode.INTERFACES, indicating that the proxy should implement the ShoppingCart interface and delegate to the implementation bean.
这段话其实非常精髓的,大概是这么说的:现在让我们记住这个关于scoped proxies的理解,在这个计出上,我们再继续讨论proxyMode属性,再上面的例子中proxyMode被配置为ScopedProxyMode.INTERFACES,这个意思就是说,那个要被注入到StoreService的proxy,应该实现ShoppingCart interface,并且实现delegation的功能,把interface对应的函数调用,delegate到实现ShoppingCart的Bean上。
当ShoppingCart是一个interface的时候,这是最理想的,因为可以自己implement那个proxy,同时implement对应的Bean。但是如果ShoppingCart是一个concrete class的话,那么Spring就没办法创建一个基于interface的proxy了。再这种情况下,就不得不去基于CGLib去实现一个基于类(class based)proxy了。在这种情况下,proxyMode的取值就因该是 ScopedProxyMode.TARGET_CLASS了。至于这个CGLIB怎么使用,就不清楚了,需要进一步的阅读@todo.
下面这张图就完美的诠释了从Singleton到Scoped Bean之间,使用ScopedProxy进行delegation的事情
使用注解完成上面的Scoped Bean的Proxy好像简单一点,但是我还没看到实际的例子。书中提到当然xml的方式也可以完成,使用xml配置的话,就需要使用aop namespace中的元素了,叫做
由于第四章就要开始将AOP了,所以这里就不多讲了。
Runtime Value Injection
当我们讨论DI和Wiring的时候,我们通常都是说的wiring一个Bean的reference到一个property或者一个constructor的parameter,这表达的是一个object和另外一个object的关系。
但是其实Wiring还有另外一个经常使用的一面,就是把一个value值wiring到一个property或者一个构造器的参数上。
比如在第二章中,作者抽象出来一个BlankDisc的对象,我们在Java Configuration类中,生成Bean的时候,直接设置BlankDisc的title和author,如下的样例:
@Bean
public CompactDisc sgtPeppers() {
    return new BlankDisc(
        "Sgt. Pepper's Lonely Hearts Club Band",
        "The Beatles");
}
作者觉得上面的写法虽然达到的我们的目的了,但是这个配置类就写了非常多的硬代码(hard-coded),就算我们用xml的配置文件,实际上这些值把xml文件变成hard-coded了。
并不是说不好,而是说,当你需要有些值,在运行的时候才确定的,那么Spring提供了2种不同的方式:
- Property placeHolders.
- The Spring Expression Language(SpEL).
getting property from environment
下面首先看第一种,property placeholder,最简单的方式就是使用Spring Environment,我们从environment种retrieve一个值。这个例子非常直白和简单
package com.soundsystem;
import org.springframework.beans.factory.annotation.Autowired;
import org.springframework.context.annotation.Bean;
import org.springframework.context.annotation.Configuration;
import org.springframework.context.annotation.PropertySource;
import org.springframework.core.env.Environment;
@Configuration
@PropertySource("classpath:/com/soundsystem/app.properties")
public class ExpressiveConfig {

    @Autowired
    Environment env;

    @Bean
    public BlankDisc disc() {
        return new BlankDisc(
            env.getProperty("disc.title"),
            env.getProperty("disc.artist"));
    }
}
上面的写法很直白,但是那个叫做Environment的envproperty很显眼,直接使用了@Autowired注解,难道@PropertySource还有这个能力?
看了一下Spring的API,发现不是这么回事的。Java doc for @PropertySource
从@PropertySource注解的文档来看,是这么说的,这个注解提供了一个方便和声明式的机制,用来把一个 PropertySource增加到Spring的Environment种。是配合Java @Configuration Class一起使用的,就像上面这样。
所以那个@Autowired,应该是Spring的程序启动的时候,初始化context的时候,肯定会生成一个Environment,所以Context会自动把对应的Environment注入到这个Configuration类中。
综上来看还是真的很方便啊。Spring同时也提供了另外一种,使用placeholder的方式:
Resolving property placeholder
xml配置的方式看起来很简单,比如下面就是生成BlankDisc类型的Bean的一个xml的配置片段:
<bean id="sgtPeppers"
    class="soundsystem.BlankDisc"
    c:_title="${disc.title}"
    c:_artist="${disc.artist}" />
从上面的片段,我们可以看出,我们想要创建的Disc的title和artist都是来自外部的配置文件。但是怎么去resolve这些值,就后面再说吧。
然后提到了等价的java configuration class的方式是使用 @Value和 PropertySourcesPlaceholderConfigurer,但是又没有详细解释,所以看不懂了,后面继续看吧。@todo
Wiring with the Spring Expression Language
从Spring 3开始引入了 SpEL,一个非常强大但是很简洁的机制。SpEL有下面的能力
- The ability to reference beans by their IDs
- Invoking method of object and accessing properties on objects
- Mathematical, relational and logical operation on values
- Regular Expression matching
- Collection manipulation
在本书的后续的章节中,我们将会看到SpEL除了可以用在DI上,还被用在了Spring Security上,如果你使用Thymeleaf模板作为views在你的Spring MVC程序中,那么这些模板将会使用SpEL来引用model data。
虽然这么强大,我们还是从简单的开始吧,The first thing to know is that SpEL expressions are framed with #{ … }, much as property placeholders are framed with ${ … }.
最简单的SpEL比如 #{1},我们去掉#{}这个marker,我们会发现只剩下了一个数字常量。这个非常简单,那么下面的就比较有用了
#{T(System).currentTimeMillis()}
从字面的意思来看,是利用Java的System类里面的currentTimeMillis()函数获得当前系统时间的毫秒的表示形式。
当然SpEL也可以reference to other beans or properties on those beans,比如下面这个表达式
#{sgtPeppers.artist}
总结以下SpEL就是Spring这个框架自己发明的一套表达式,语法看着有点像Java,估计也就是自己写了表达式的求值引擎,然后求值,没啥特殊的,如果是开源的话,可以研究研究这种表达式引擎要怎么实现。
好了,前面第二,第三章都是讲DI的,现在对于bean wiring我们有了一些坚实的基础知识了,我们从第四章开始了解AOP了。
tags: Spring in Action 4th edition